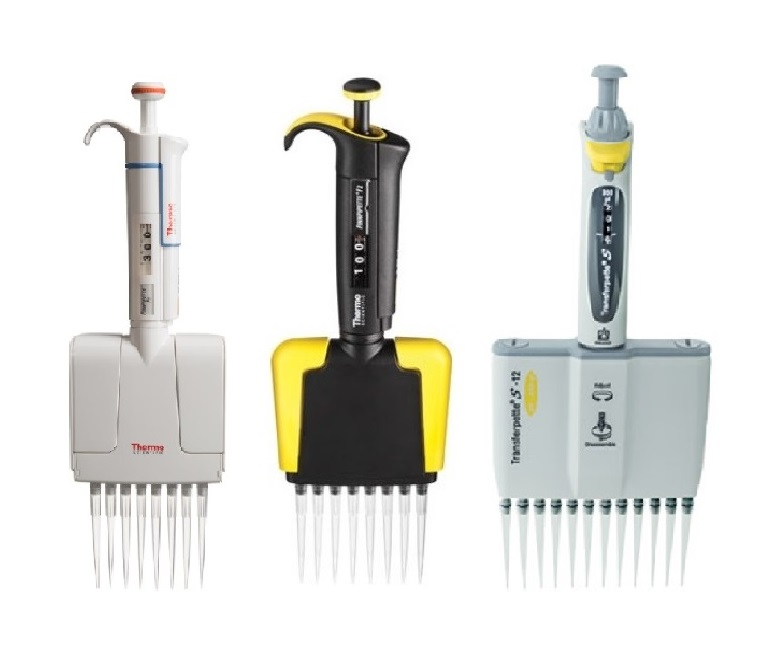
In some situations (note the following exception), it is only necessary to verify the accuracy of one channel. The exception being critical experiments where regulatory agencies mandate that all channels must be gravimetrically evaluated (using correct equipment and procedures) and accuracy and precision properly documented.
All channels in a multichannel pipette are driven by a single plunger rod that is connected to a push bar rod that is attached to 8-12 piston assemblies. The movement of the plunger rod in aspiration and dispensing cycles expels the same and equal quantity of air to aspirate the same and equal volume of liquid. All channels must be leak-free and the sealing components in the liquid end must be in sound condition. Make sure all channels are airtight (use visual gravity method in the absence of a leak tester). Be sure to change the sealing components, if needed.
To check for leaks:
Load tips onto the pipette
Set the volume to 100% and aspirate water into all 8-12 tips
Withdraw the pipette tips from the water and wait 15 seconds to see if any visible leaks form
Be sure to verify the water level from channel-to-channel.
Verify the accuracy of any one channel with the balance of proper sensitivity [adjust the 10% volume with the tool, if needed (tool varies with pipette model)] to make sure the accuracy is within the specified tolerance. Calibration adjustments should always be made at the 10% volume for accuracy and precision, as per most manufacturer’s guidelines.
Disclaimer: Any action you take using the information on this website is strictly at your own risk. The information herein does not constitute professional advice and is general in nature. We make no warranty that this information will meet your requirements, be safe, accurate, or error-free. Pipette Supplies, Inc. is not responsible for any errors or omissions, any results obtained from the use of this information, or any loss or damage arising out of the use of this information. This site is for educational purposes only. Fair Use: Copyright Disclaimer under section 107 of the Copyright Act of 1976, allows for “fair use” for purposes such as comments, criticism, teaching, scholarship, news reporting, and research. Fair use is permitted by copyright statute that might otherwise be infringing.
Have you ever been frustrated by non-linear volume readings at different volume settings after inspection, cleaning, or preventive maintenance?
For example, let’s say you’ve completed the initial pipette evaluation steps: pipette inspection, cleaning, preventive maintenance, lubrication of parts as per manufacturer’s recommendations, and replacing wearable components (seal, o-ring, etc.). The mechanical parts appear to be working properly, and the pipette is leak free after aspirating and dispensing the sample at the desired volume setting.
You weigh your first sample, say at 200uL in a 1000ul pipette and it’s 199.7uL – absolutely within manufacturer’s specification. Then you set the volume at 1000uL, aspirate, and weigh the sample and it’s only 989uL (out of tolerance). You immediately grab your volume adjustment tool, to make a calibration adjustment at 1000uL, but is this the correct decision at this time? No, it’s not!
How to determine a calibration issue versus a part/component issue, insufficient equilibration time, or human error.
What’s the correct diagnosis? Calibration adjustments should only be made as the last resort after verifying 100% that the seal, o-ring, shaft, piston assembly, and pipette tip(s) are in good working condition. This is coupled with a minimum of 1-hour equilibration time after pipette preventive maintenance and reassembly have occurred. For best results, the pipette must be allowed to return to ambient conditions for at least 1 hour prior to gravimetric evaluation.
Each pipette liquid end component(s) needs to be 100% verified and/or replaced if there is any question or doubt about their integrity. Sometimes it can be a process of elimination with replacing parts. Failure to do so will only mask the issue(s) at hand, not resolve them. Did you know that failures to any of the following five (5) pipette sealing system components may make up to 95% of all pipette performance issues? Verify and confirm the following parts are in good condition. If unsure, replace them.
Seal & O-Ring: Account for up to 60% of all pipette performance issues. Seals should be replaced at least every 12 months, based on frequency of use. O-rings should be replaced every 1-2 years.
Piston Assembly: Account for up to 20% of pipette performance issues. Due to premature wear and tear to the seal, o-ring, springs, corroded, rusted, bent pistons, insufficient lubricant, lubricant migration, incorrect lubricant used, etc., piston assemblies (stainless steel, plastic, porcelain, etc.) should be inspected, cleaned, and replaced every 3-5 years, based on frequency of use and condition.
Shafts: Account for up to 10% of pipette performance issues due to chemical splash, blocked shaft orifice, or a worn, scratched, or pitted shaft from loading and ejecting tips over time. Shaft replacement should occur every 2-3 years, based on frequency of use and if chemical splash is present. The clear coat portion of the shaft begins to wear away over time due to the process of loading and ejecting tips. Roughening up the shaft portion (part where the tip seals) to the shaft is a short-term solution. Eventually the tip will begin to slip and not seal as it should.
Pipette Tip(s): Account for up to 5% of pipette performance issues, possibly higher if non-manufactured tips are used. Manufacturer’s design their pipettes to perform best with their tips. While other tip brands may be compatible, the end user should verify that the volume aspirated and dispensed is desirable. This is compounded when filtered tips are used as they have various pore sizes that allow air to flow through the filter in order to aspirate and dispense liquids.
Pipette Handle/Body:The remaining 5% of pipette performance issues, reside inside the pipette body. It is recommended that a qualified pipette service provider be contacted for support and/or provide repair service if needed. Please note that bent or warped plunger rods, internal damage to the volume display, over travel issues with the micrometer, miscellaneous internal damage, damaged pinion gears, counter assemblies, etc. often go undetected until a qualified service provider examines the pipette.
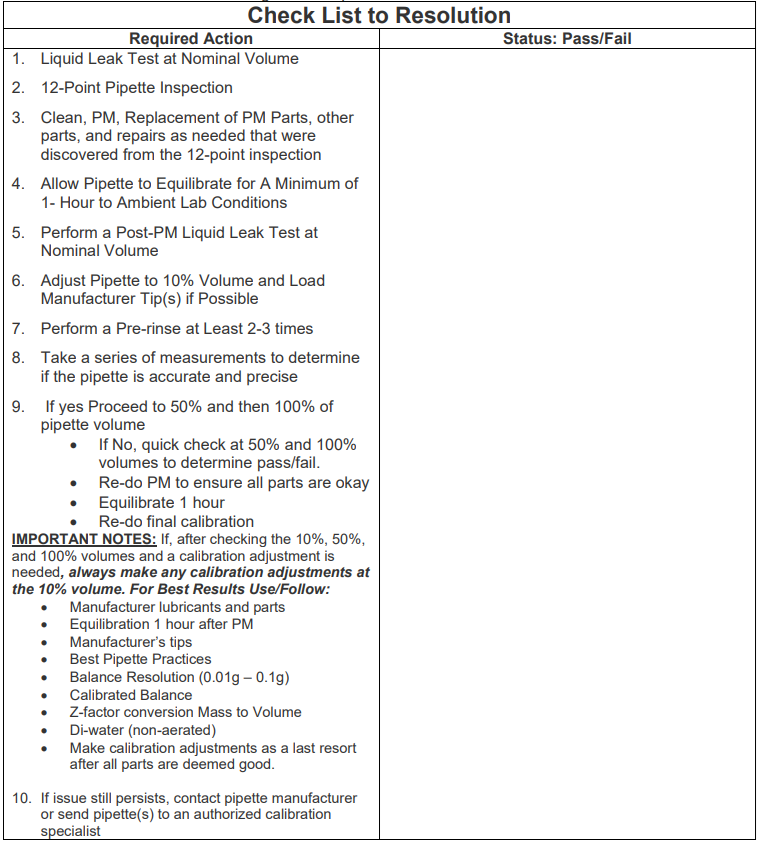
Plan of Action and Potential Resolution
A thorough pipette inspection, evaluation, cleaning, and replacement of vital sealing system parts may be required. This includes, but is not limited to:
A 12-point visual inspection of the pipette sealing system parts
Plunger Button
Plunger Rod
Volume Lock
Volume Display
Piston Assembly
Piston Spring(s)
Seal
O-Ring
Shaft
Tip Ejector Arm
Tip Ejector Button
Pipette Tips
2-Minute Liquid Leak Test: Set the volume to nominal (100%) and load a tip onto the pipette shaft. Aspirate di-water into the tip and pause 1 second after aspiration. Gently remove the tip from the water and count to 15. You are looking for any liquid droplets that come out the end of the tip before 15 seconds have elapsed. If detected, this indicates a leak/breach in the pipette sealing system components: seal, o-ring, shaft, piston, pipette tip. Inspect and replace parts as needed.
Lastly, Calibration Adjustments: Performing a calibration adjustment is a last resort after pipette parts are replaced, equilibrated, and deemed in good condition. Any calibration adjustment should always be made at the 10% volume, not 50%, or 100% unless recommended by the pipette manufacturer. Adjustments are made in micro-steps (about an 1/8 of a turn in a clock-wise or counter-clockwise motion). Making calibration adjustments at any volume other than 10%, could compromise the linearity, accuracy, and repeatability of the aspirated and dispensed volumes. For example, you make a calibration adjustment at 100% volume range, you may skew the 10% – 95% volume ranges.
If the pipette calibration performance issues persist, contact a qualified pipette repair/service provider to resolve the concern(s) at hand.
Disclaimer: Any action you take using the information on this website is strictly at your own risk. The information herein does not constitute professional advice and is general in nature. We make no warranty that this information will meet your requirements, be safe, accurate, or error-free. Pipette Supplies, Inc. is not responsible for any errors or omissions, any results obtained from the use of this information, or any loss or damage arising out of the use of this information. This site is for educational purposes only. Fair Use: Copyright Disclaimer under section 107 of the Copyright Act of 1976, allows for “fair use” for purposes such as comments, criticism, teaching, scholarship, news reporting, and research. Fair use is permitted by copyright statute that might otherwise be infringing.