Category: BrandTech

  • BrandTech Dispensette S – Valve/Discharge Tube Replacement

    warning

    The process of removing, replacing, and reinstalling the valve assemblies & Discharge Tubes on the BrandTech Dispensette S, S Organic, and S Trace requires great care, a high attention to detail, patience, and steady hands. Please dedicate a good work area with good lighting and space where small parts can be located should they fly out during disassembly. Pipette damage and lost parts may occur if attention to detail is not maintained. Please proceed at your own risk.

    Replacement Parts:

    1. Discharge Tubes
      • Dispensette S, S Organic, & S Trace
        • The discharge tube is available in two variants, one with a recirculation valve and one without. An easy way to determine which variant you have is to look for the knob on top of the discharge tube.
    2. Discharge Valves
    3. Filling Valves

    Note: There are special tools to remove the discharge and filling valves. They are typically included when purchasing the unit.

    Recommend Supplies:

    1. Gloves
    2. Pipette Tip or 6” Q Tip
    3. Dispensette S, S Organic, S Trace, & Seripettor Pro Mounting Tool

    Preliminary Note(s):
    The Dispensette S, S Organic & S Trace models have discharge and filling valves threaded into the body of the bottletop, unlike the older models (Dispensette III & Dispensette Organic).

    It is important to ensure the bottle top has been properly flushed with water prior to removing or replacing parts.

    Discharge Tube Disassembly/Assembly:

    To remove the discharge tube, unseat the clips by applying upward pressure to the outer gray shell.
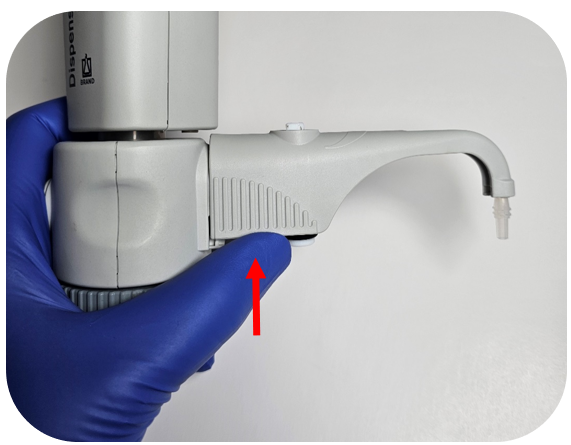
    Removing the Dispensette S discharge tube

    After the clips are unseated, pull the discharge tube away from the bottletop dispenser body while applying light downward pressure on the tube.

    Note: The Dispensette S, S Organic, and S Trace Analysis models share the same discharge tube connection. However, it is recommended to use the correct part for each model, as there are differences in their use cases and specifications.

    To reseat the discharge tube, firmly insert the tube(s) into their respective openings on the bottletop body until they are fully seated.
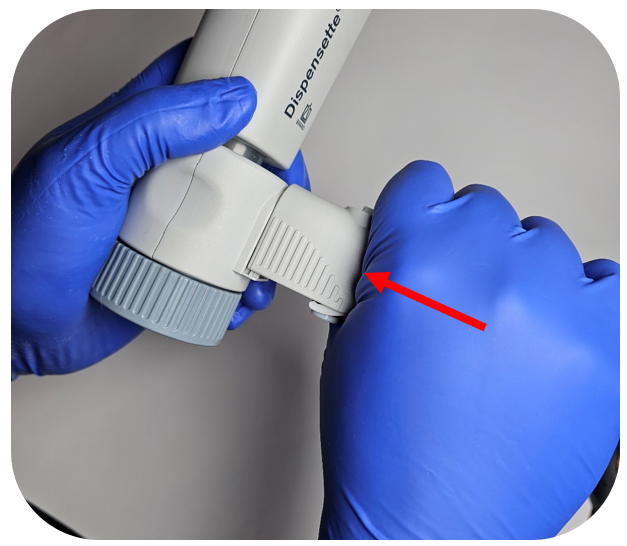
    Dispensette S discharge tube reseating

    While keeping the inward pressure, push down on the discharge tube assembly until it clicks into place.
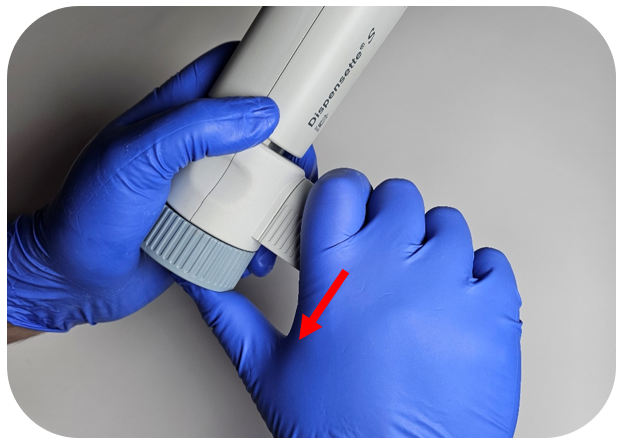
    reseating
    Discharge & Filling Valve Replacement:

    See the valve locations referenced in the pictures below:

    Discharge Valve:
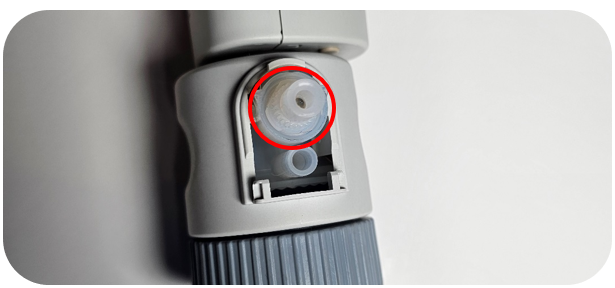
    Identifying Dispensette S discharge valve

    Filling Valve:

    Identifying Dispensette S filling valve

    Note: The filling valve is more commonly clogged since it is positioned vertically, allowing solution to settle around the glass ball inside the valve. Refer to the instructions below to free the valve.

    After locating the valve, use the mounting tool to remove it. Ensure the tool is fully seated, then unscrew the valve assembly by turning it counterclockwise.
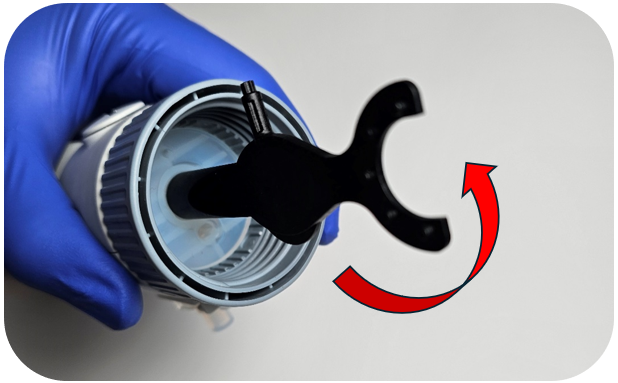
    using the Dispensette S mounting tool

    Next secure the new valve in the mounting tool and turn the valve clockwise to tighten. Be careful not to overtight the valve as you can strip the body of the bottletop.
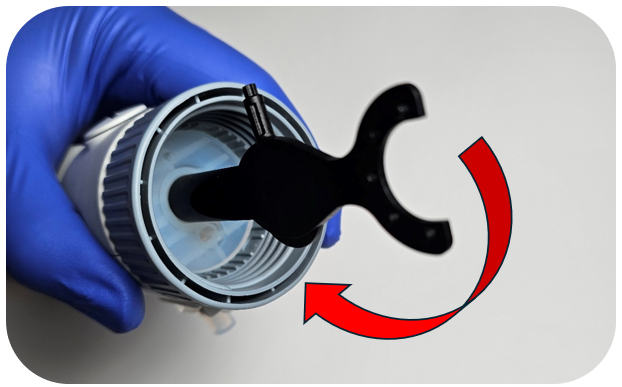
    turn the valve clockwise to tighten
    Resetting A Stuck Valve:

    It is fairly common for a valve to become stuck. This can occur in either the filling valve or the discharge valve, but the process to free it is simple.

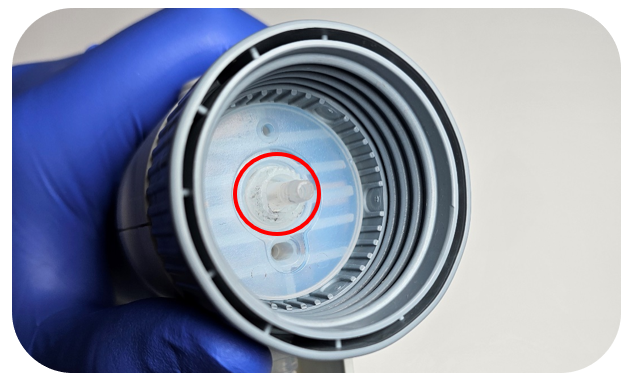
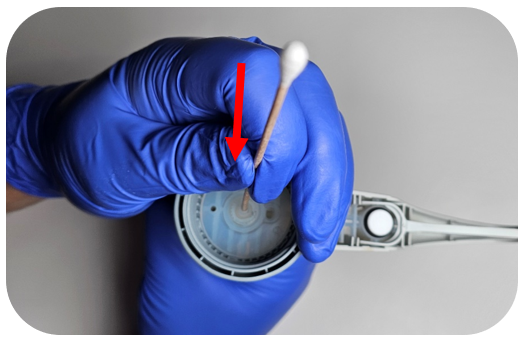
    To free the valve, insert a 200 µL pipette tip or the wooden end of a 6-inch cotton swab (Q-Tip) into the valve opening. Apply gentle downward pressure to depress the glass ball inside the valve and release it.

    This procedure resolves most issues with these bottletops. However, if the problem persists, the valve may need to be replaced.

    Discharge Valve:
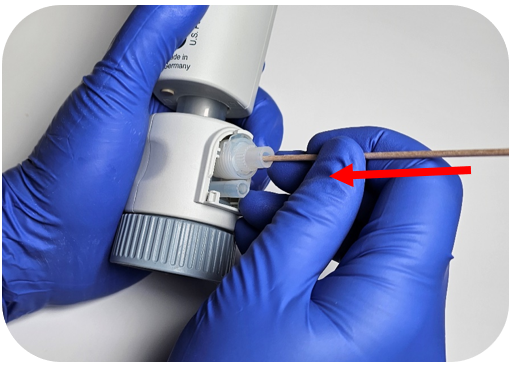
    q-tip in Dispensette S discharge valve

    Filling Valve:

    q-tip in filling valve

    Note: This resetting procedure works for nearly all of the bottletop dispensers that BrandTech has made. The main difference is the older models do not have removeable valves.

    Disclaimer: Any action you take using the information on this website is strictly at your own risk. The information herein does not constitute professional advice and is general in nature. We make no warranty that this information will meet your requirements, be safe, accurate, or error-free. Pipette Supplies, Inc. is not responsible for any errors or omissions, any results obtained from the use of this information, or any loss or damage arising out of the use of this information. This site is for educational purposes only.
    Fair Use: Copyright Disclaimer under section 107 of the Copyright Act of 1976, allows for “fair use” for purposes such as comments, criticism, teaching, scholarship, news reporting, and research.
    Fair use is permitted by copyright statute that might otherwise be infringing.
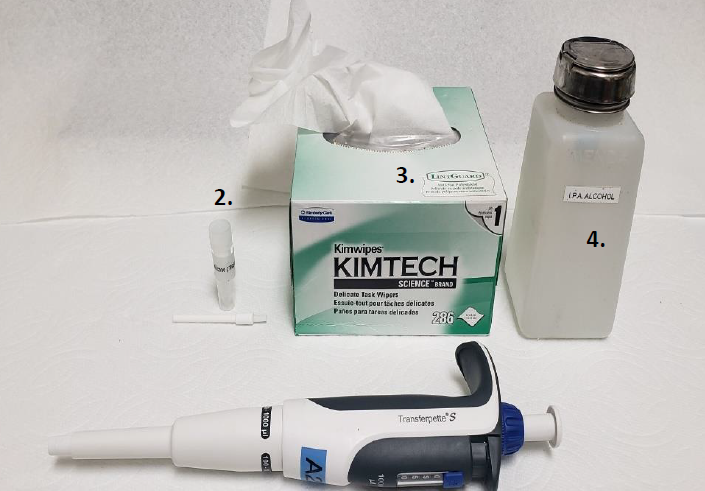
  • Preventative Maintenance: Transferpette S Single Channel (2uL-1000uL)

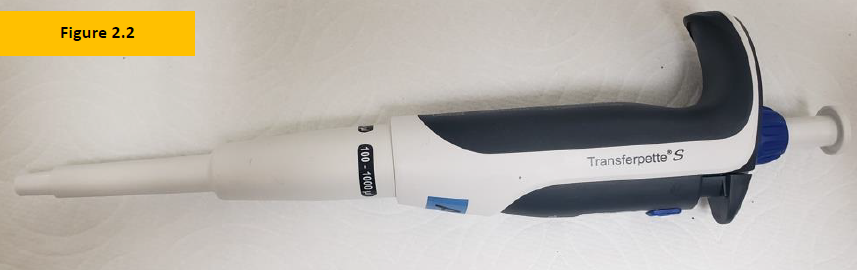
    The process of disassembly, removing, replacing, and reinstalling parts, as well as, performing preventive maintenance (PM) on the Brand Transferpette S single channel pipette require great care. A high attention to detail, patience, and steady hands are required. Please dedicate a good work area with good lighting and space where small parts can be located should they pop/fly out during disassembly. Pipette damage and lost parts may occur if attention to detail is not maintained. Please proceed at your own risk.

    Recommended Supplies
    1. Pair of gloves (not pictured)
    2. Transferpette S Silicone Oil item# BT 705502 (for use with up to 1000uL volume sizes)
    3. Box of Kim Wipes
    4. Bottle of IPA 70%
    5. Replacement parts

    NOTE: These instructions are for Transferpette S single channel pipettes that are between 2uL-1000uL volume sizes. It’s recommended that a 4-5 place analytical balance be used to check the accuracy and precision performance after PM and 1 hour equilibration period is completed.

    supplies needed for Transferpette S preventative maintenance
    Transferpette S Disassembly and Preventative Maintenance
    Step 1:

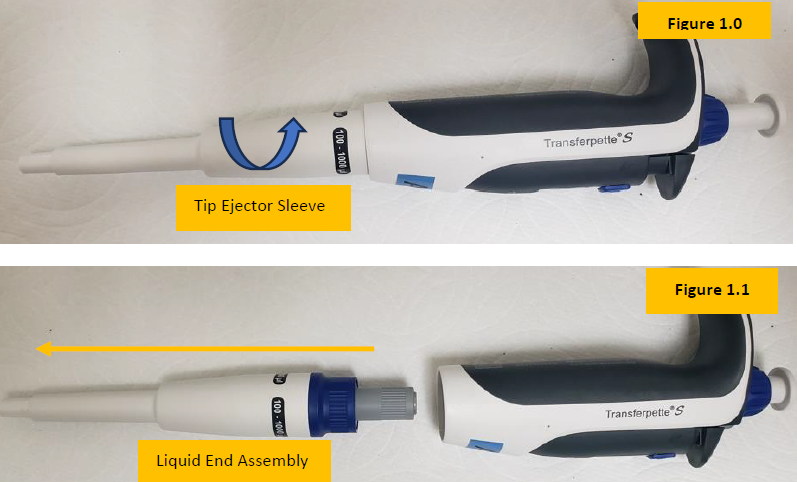
    Rotate and unscrew the Transferpette S tip ejector sleeve from the pipette body. See Figure 1.0

    Once fully unthreaded, the entire shaft assembly will detach from the pipette body, as shown in Figure 1.1.

    removing the lower part
    Step 2:

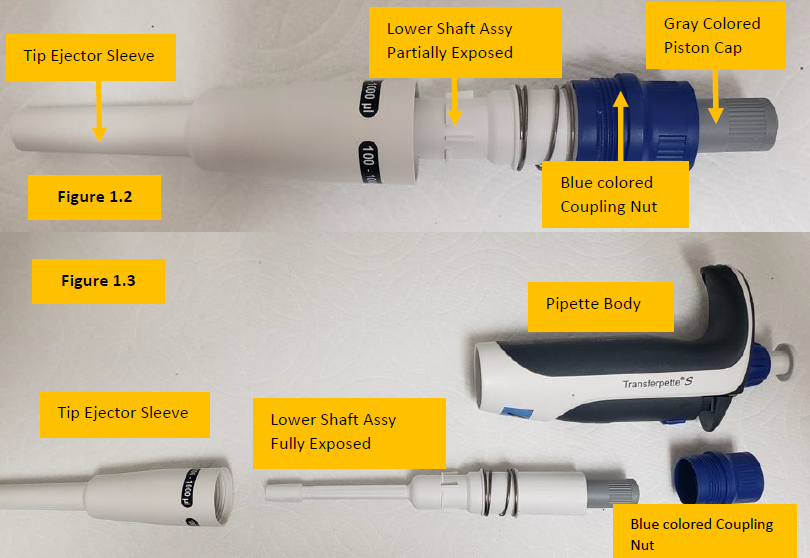
    Unscrew the blue colored coupling nut so that the tip ejector sleeve can be removed fully, thus exposing the lower shaft assembly. See Figure 1.2

    Observation: Figure 1.3 shows the lower shaft assembly fully visible and separated from the tip ejector sleeve.

    Disassembled Transferpette S with labels
    Step 3:

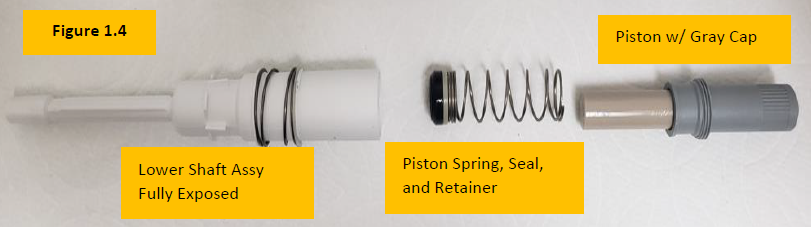
    Unscrew the gray colored piston cap to expose the internal piston, piston spring, seal and seal retainer. Remove fully from the Transferpette S lower shaft assembly. Figure 1.4

    Transferpette S lower part disassembled
    Step 4:

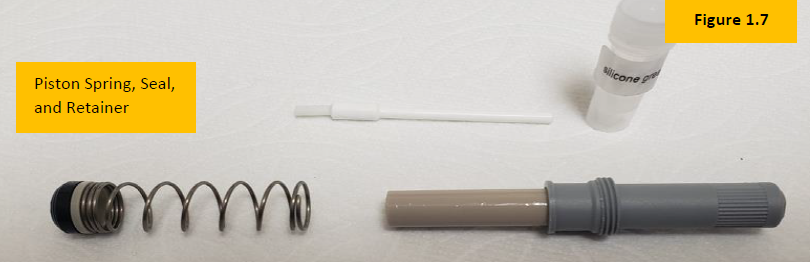
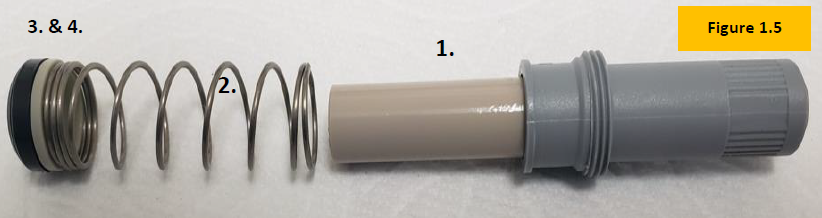
    Inspect the piston (1), piston spring (2), seal (3), and retainer (4). Figure 1.5. With a Kim wipe, clean and fully remove old lubricant from the piston, seal, and retainer.

    Piston Assembly
    Step 5:

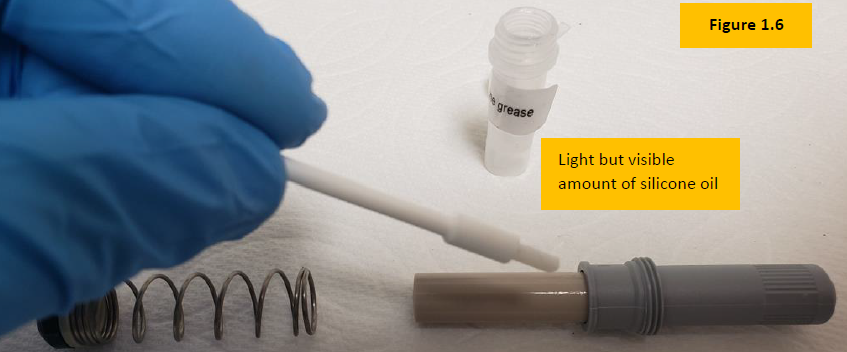
    Apply a light, but slightly visible amount of Transferpette S silicone oil onto the piston assembly. Figure 1.6

    Applying oil to the Transferpette S piston assembly
    Step 5A:

    Install a new seal assembly onto the retainer.

    Finished piston assembly
    Transferpette S Reassembly
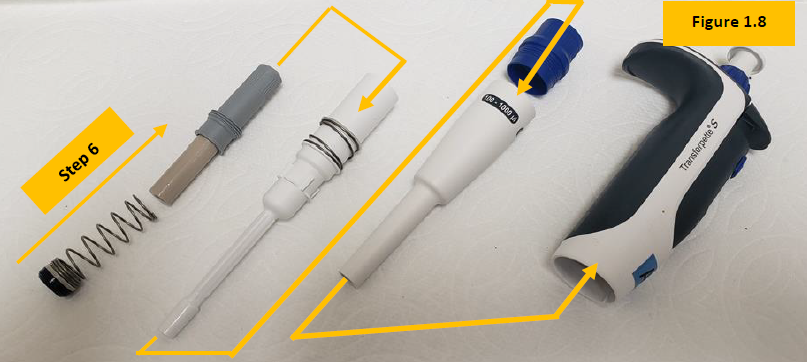
    Step 6:

    Attach seal retainer to the piston spring. Slide the seal, retainer, and spring back onto the piston with gray cap. Figure 1.8


    Step 6A:

    Inspect and replace shaft, tip ejector sleeve, piston if needed.

    Reassembling the Transferpette S
    Step 7:

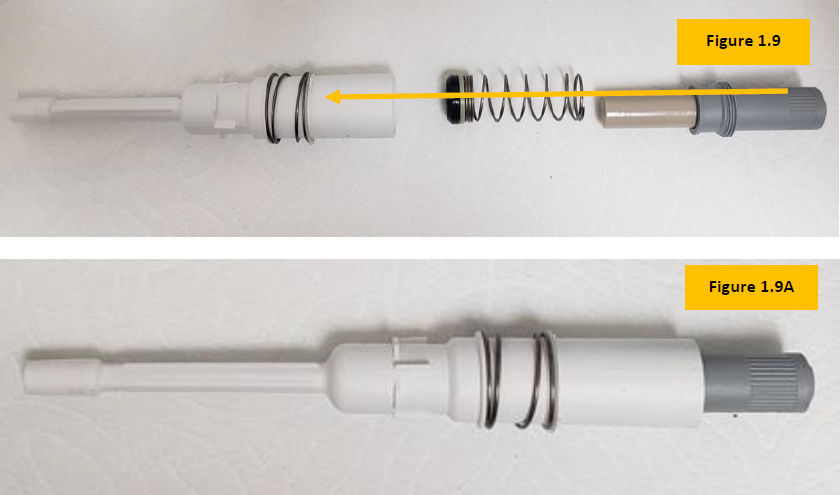
    Slide the piston assembly back inside of the lower shaft assembly. Turn and tighten the gray piston cap until the piston assembly is fully secured inside of the shaft. Figure 1.9 and 1.9A

    Reassembling the lower part
    Step 8:

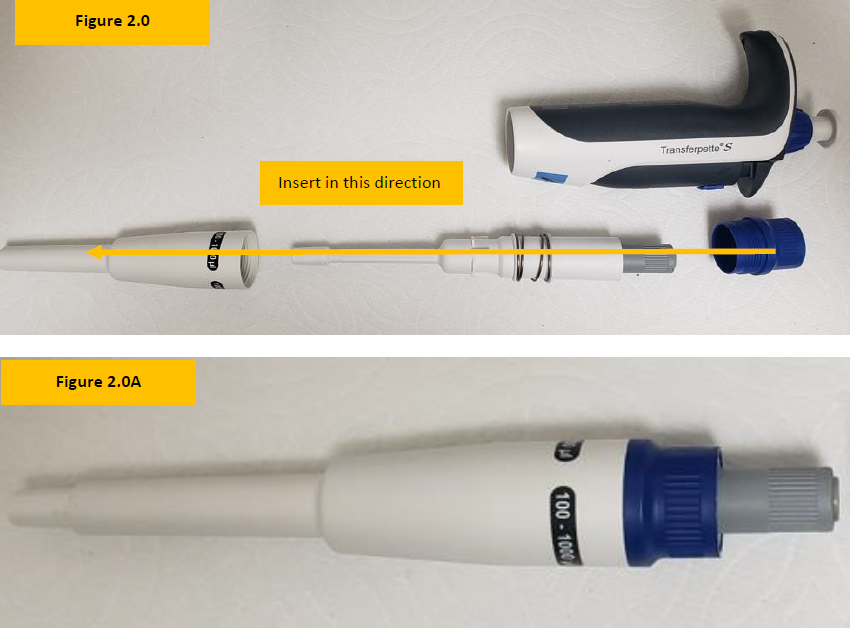
    Locate the blue colored coupling nut. Insert the lower shaft assembly into the tip ejector sleeve. Figure 2.0

    Rotate and turn blue colored coupling nut until the lower shaft is fully secured inside of the tip ejector sleeve. Figure 2.0A

    reassembling the lower part
    Step 9:

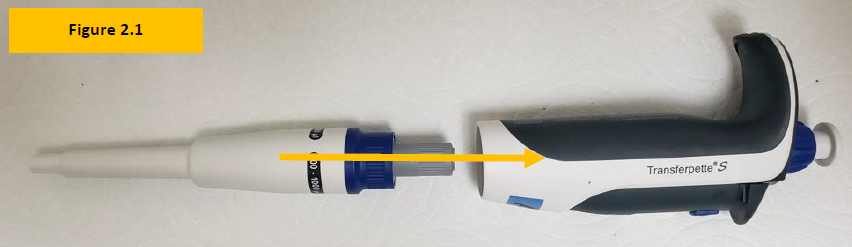
    Insert the liquid end assembly into the pipette body opening and rotate the tip ejector sleeve until it is tight with the body.

    Attaching Transferpette S lower part to handle
    Step 10:

    Once fully reassembled, allow the pipette to equilibrate for at least 60 minutes. After the equilibration period has passed verify accuracy and precision on a 4-5 place analytical balance.

    Reassembled Transferpette S
    Related Posts:

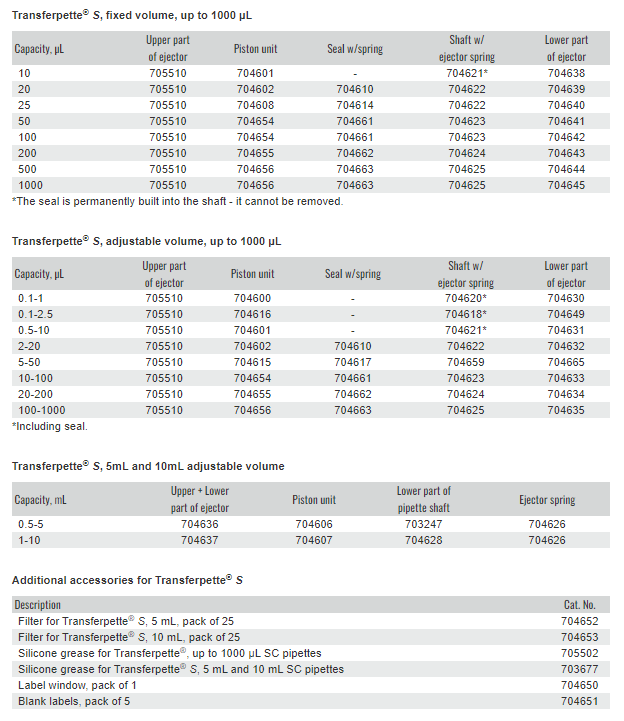
    Transferpette S Parts Decoded
    BrandTech Serial Number Format
    BrandTech Transferpette Multichannel Nose Cone Part Numbers

    Disclaimer: Any action you take using the information on this website is strictly at your own risk. The information herein does not constitute professional advice and is general in nature. We make no warranty that this information will meet your requirements, be safe, accurate, or error-free. Pipette Supplies, Inc. is not responsible for any errors or omissions, any results obtained from the use of this information, or any loss or damage arising out of the use of this information. This site is for educational purposes only.
    Fair Use: Copyright Disclaimer under section 107 of the Copyright Act of 1976, allows for “fair use” for purposes such as comments, criticism, teaching, scholarship, news reporting, and research.
    Fair use is permitted by copyright statute that might otherwise be infringing.
  • BrandTech Transferpette S Parts Decoded

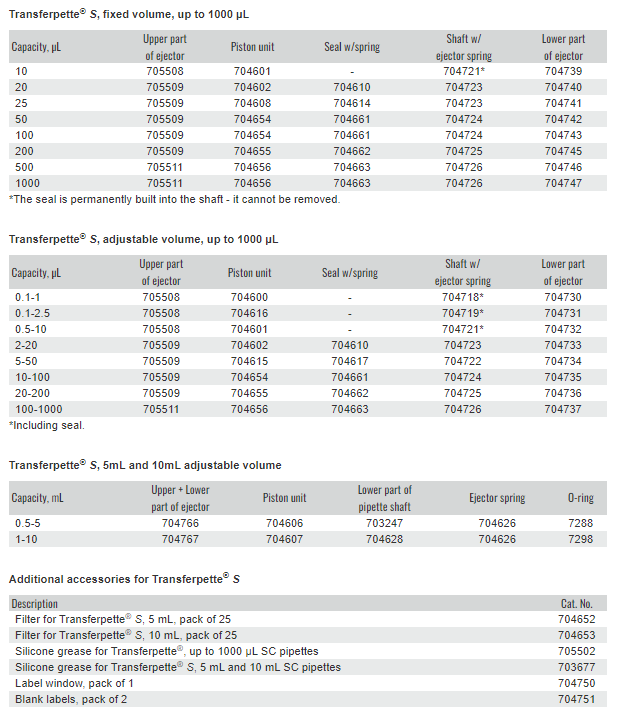
    There have been many versions of the BrandTech Transferpette S over the years. Use this page to find the right parts for your pipette!

    Shop Spare Parts Here:
    Transferpette S Single Channel
    Transferpette S Multichannel

    To determine the year your pipette was manufactured, see BrandTech Serial Number Format.

    Transferpette S Single Channel (pre-2020)
    Pre 2020 single channel

    NOTE: If the pipette still has an original GLASS piston (older units), it must be replaced with a new composite piston and seal. Check with Pipette Supplies for the correct part number.

    BrandTech Transferpette S Single Channel (pre-2020) Spare Parts
    Transferpette S Single Channel (2020+)
    Post 2020 single channel

    NOTE: The pistons and seals did not change from the pre-2020 model. It is primarily the visible (outer shaft) components that are different.

    BrandTech Transferpette S Single Channel (post-2020) Spare Parts
    2026 Update for Transferpette S 2mL Fixed Pipette:
    Table displaying BrandTech Transferpette S Parts updates, detailing part number, description, volume range, and notes on serial number fixes for TFP S 2 mL parts.
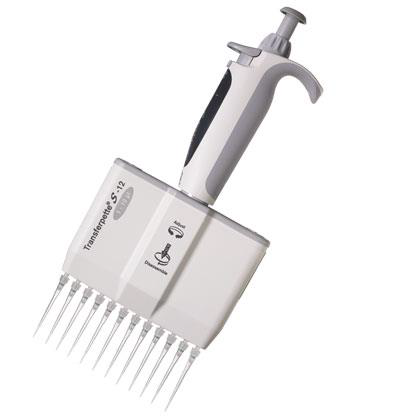
    Transferpette S Multichannel (pre-2020)
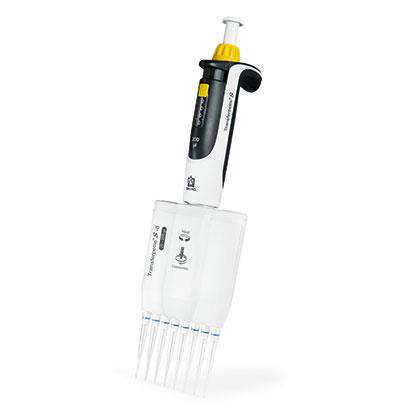
    Multichannel (pre-2020)
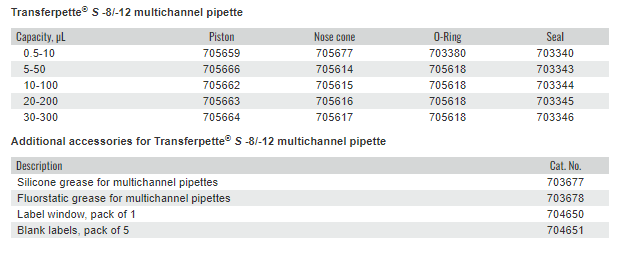
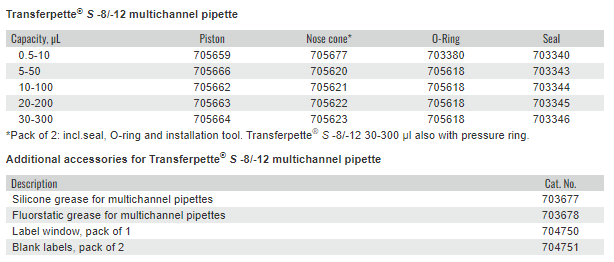
    BrandTech Transferpette S Multichannel (pre-2020) Spare Parts

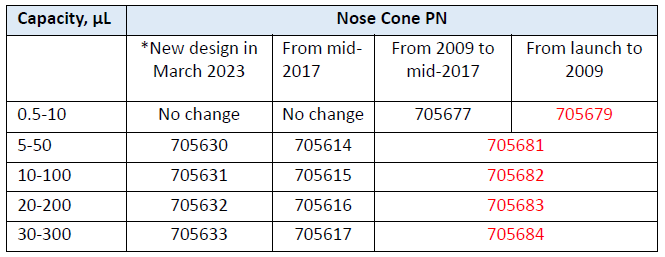
    Evolution of nose cone part numbers:

    BrandTech Transferpette S Multichannel (pre-2020) Nose Cones

    RED FONT = Discontinued; If pipette has not been updated with new nose cones, ALL nose cones must be replaced.

    *New nose cone design introduced in March 2023 is an alternative to 705614-705617 (see next section for pictures that illustrate the difference). Both options are available (until further notice) and compatible with the pipettes, BUT must have ALL nose cones of the same part number – cannot mix.

    Transferpette S Multichannel (2020+)
    Multichannel (post-2020)
    BrandTech Transferpette S Multichannel (post-2020) Spare Parts

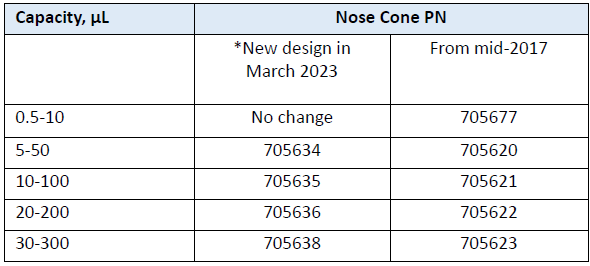
    NOTE: As of March 2023 (SN 23Cxxxxx), 5-50 μL to 30-300 μL BrandTech Transferpette S pipettes are manufactured with the newest design nose cone (see below); O-ring (705618) did NOT change


    Pipettes can use EITHER new or old design, but must have ALL of one design – cannot mix

    BrandTech Transferpette S Multichannel (post-2020) nose cones
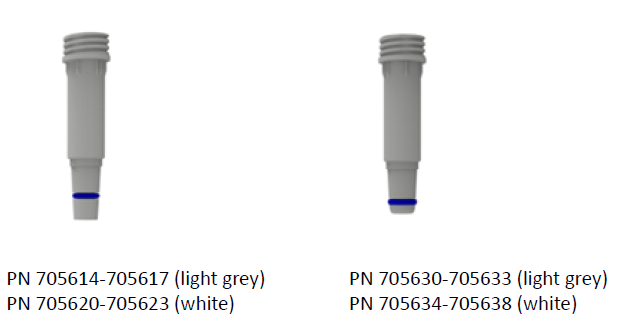
    Illustration of old vs. new (from March 2023) nose cone design
    Illustration of old vs. new (from March 2023) nose cone design

    Light grey = pre-2020 model
    White = 2020+ model
    New design is more rounded and slightly shorter. Position of O-ring is modified.
    Materials and O-ring (705618) did NOT change.

    Related Posts:

    BrandTech Serial Number Format
    BrandTech Transferpette Nose Cone Part Numbers
    Transferpette Adjustment Knob Installation, Item # BT 9481

    Disclaimer: Any action you take using the information on this website is strictly at your own risk. The information herein does not constitute professional advice and is general in nature. We make no warranty that this information will meet your requirements, be safe, accurate, or error-free. Pipette Supplies, Inc. is not responsible for any errors or omissions, any results obtained from the use of this information, or any loss or damage arising out of the use of this information. This site is for educational purposes only.
    Fair Use: Copyright Disclaimer under section 107 of the Copyright Act of 1976, allows for “fair use” for purposes such as comments, criticism, teaching, scholarship, news reporting, and research.
    Fair use is permitted by copyright statute that might otherwise be infringing.
  • BrandTech Transferpette Multichannel Nose Cone Part Numbers

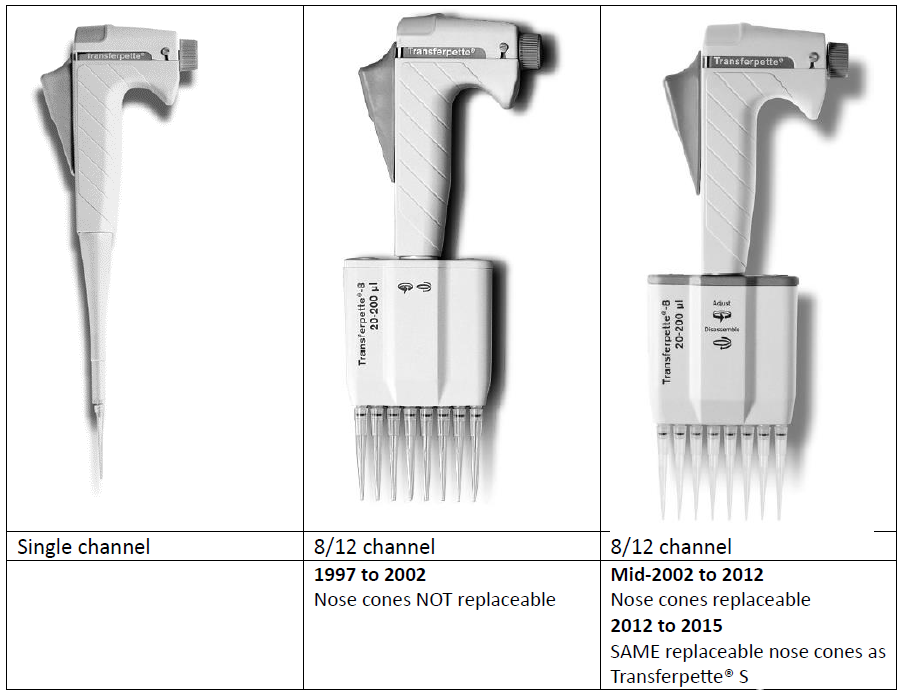
    The old BrandTech Transferpette (Mechanical) pipette was discontinued in 2015. Most replacement parts, including nose cones, are no longer available. You can find all available parts here: Transferpette Multichannel Mechanical

    Transferpette Eras

    Multichannel Transferpettes with serial numbers – 01K (Jan 2012) or newer can use nose cones for Transferpette S:

    Transferpette Nose Cone part numbers

    **Note that unless the pipette has already been updated with the nose cones above, ALL nose cones must be changed out to the current style; for most pipettes, it usually makes more sense to update to a new multichannel Transferpette S.

    Related Posts:

    Transferpette Adjustment Knob Installation, Item # BT 9481
    BrandTech Serial Number Format
    BrandTech Transferpette S Parts Decoded

    Disclaimer: Any action you take using the information on this website is strictly at your own risk. The information herein does not constitute professional advice and is general in nature. We make no warranty that this information will meet your requirements, be safe, accurate, or error-free. Pipette Supplies, Inc. is not responsible for any errors or omissions, any results obtained from the use of this information, or any loss or damage arising out of the use of this information. This site is for educational purposes only.
    Fair Use: Copyright Disclaimer under section 107 of the Copyright Act of 1976, allows for “fair use” for purposes such as comments, criticism, teaching, scholarship, news reporting, and research.
    Fair use is permitted by copyright statute that might otherwise be infringing.
  • BrandTech Serial Number Format

    If your pipette was manufactured prior to mid-November 2015:

    First two digits are the MONTH of manufacture (i.e., 01-12)
    Letter indicates YEAR of manufacture as shown below:
    BrandTech Serial Number Example: 01A1234

    A = 2003
    B = 2004
    C = 2005
    D = 2006
    E = 2007
    F = 2008
    G = 2009
    H = 2010
    J = 2011
    K = 2012
    L = 2013
    M = 2014
    N = 2015

    If your pipette was manufactured after mid-November 2015:

    First two digits are the YEAR of manufacture
    Letter indicates MONTH of manufacture as shown below:
    BrandTech Serial Number Example: 15L1234


    A = January
    B = February
    C = March
    D = April
    E = May
    F = June
    G = July
    H = August
    J = September
    K = October
    L = November
    M = December

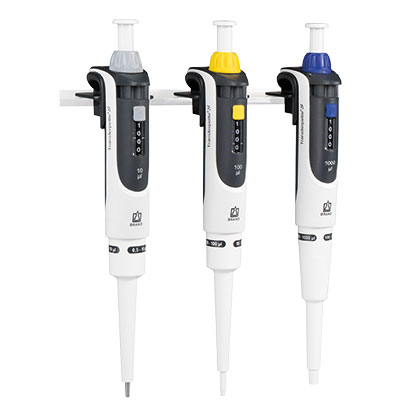
    Brandtech Transferpette pipettes

    Related Posts:
    Transferpette Adjustment Knob Installation, Item # BT 9481
    BrandTech Transferpette Nose Cone Part Numbers
    BrandTech Transferpette S Parts Decoded
    General Troubleshooting – Liquid Leak Test Testing & 12 Point Pipette Inspection

    Disclaimer: Any action you take using the information on this website is strictly at your own risk. The information herein does not constitute professional advice and is general in nature. We make no warranty that this information will meet your requirements, be safe, accurate, or error-free. Pipette Supplies, Inc. is not responsible for any errors or omissions, any results obtained from the use of this information, or any loss or damage arising out of the use of this information. This site is for educational purposes only.
    Fair Use: Copyright Disclaimer under section 107 of the Copyright Act of 1976, allows for “fair use” for purposes such as comments, criticism, teaching, scholarship, news reporting, and research.
    Fair use is permitted by copyright statute that might otherwise be infringing.
  • Transferpette Adjustment Knob Installation, Item # BT 9481

    Transferpette Adjustment Knob Installation:

    Link to product page: BT 9481

    Take micrometer window by sliding it (don’t unscrew it).  Then remove underneath gray cover.  On the other end of the micrometer, there is a locking system.  Leave the red clip on.  Remove the small metal piece while holding the micrometer numbers so they don’t move.  Slide out old Transferpette adjustment knob, insert new.

    Transferpette Adjustment Knob

    Disclaimer: Any action you take using the information on this website is strictly at your own risk. The information herein does not constitute professional advice and is general in nature. We make no warranty that this information will meet your requirements, be safe, accurate, or error-free. Pipette Supplies, Inc. is not responsible for any errors or omissions, any results obtained from the use of this information, or any loss or damage arising out of the use of this information. This site is for educational purposes only.
    Fair Use: Copyright Disclaimer under section 107 of the Copyright Act of 1976, allows for “fair use” for purposes such as comments, criticism, teaching, scholarship, news reporting, and research.
    Fair use is permitted by copyright statute that might otherwise be infringing.